Procure To Pay Cycle in Oracle Apps R12 (P2P
Cycle)
Here in this post, I tried to explain the
steps involved in Procure to Pay Cycle. This is a pure functional Stuff and
helps you to understand the navigation steps.
I tried to keep as simple as Possible
for clear understanding. The screenshots given below are taken from R12.1.1 apps
instance.
Stage 1: Choosing an Item
Let us choose an item to be procured
in our example.
Go to Purchasing Responsibility
and follow the below navigation to check
for the suitable item.


The item picked for our example
should be purchasable item as above. Click on tools and choose “Categories” to
view the below screen.

Stage 2: Creation of Requisition
Follow the below Navigation to
reach Requisition Form.

Create a new Requisition for the item
viewed in Stage 1.

Click on Distributions to View the
charge Account.

Save and Submit for Approval

Now note down the Requisition number and
open the “Requisition Summary Form” to view the status of it. For our Example,
Requisition number is: 14855
Stage 3 : Checking the Status of
Requisition

Query for the
Requisition Number and click Find.

Here for our example purpose, I
kept the submitted and approved person has same and hence it shows the status
as approved.

To see the approval status,
please follow the below navigation.


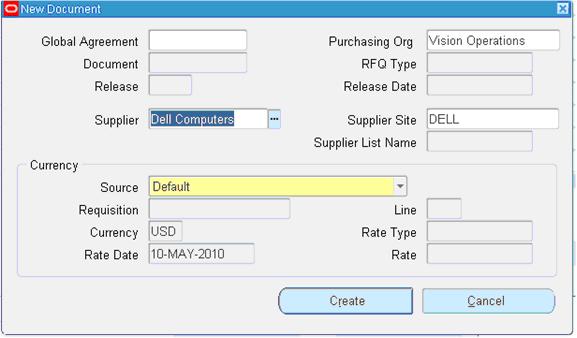
Stage 4 : Creation of Purchase Order
For creating a Purchase order, let us
use the “Autocreate Documents” Form. Follow the below Navigation

Query for the Requisition

Click on Automatic as
shown in the above figure to create a Purchase Order

Click on “Create” button to create a
Purchase order

View the shipment screen to change
the “Match Approval Level” to “2-Way”.

Click the “Receiving Controls” to
make sure that the “Routing” is made as “Direct Routing”

Click Save and submit for
Approval.


Note down
the PO Number.
Stage 5: Creation of Receipts

Query with the Purchase order created
in the above stage.

Check the check box near to the
lines that are received and click save.

Click the “Header Button” to view the
Receipt Number.

Stage 6: Checking the On Hand
Go to
any Inventory Responsibility and follow the below
Navigation

Query for our Receipt and make
sure the Organization is the same as we received.

Below screen will show that
our inventory has been increased by 5 quantities.

Stage 7: Check the Material Transactions
Follow the below Navigation to
reach “Material Transactions” Form

Query for the item and date as
below

Below screen shows the source
and transaction Type

Below screen shows you the
Serial Numbers of
the items received.

Stage 8: Creation of Invoice
Navigate to any Purchasing
Responsibility and view à Requests
Submit the below requests by
providing the Receipt number as Parameter to create an invoice.

Check the status of the
program.

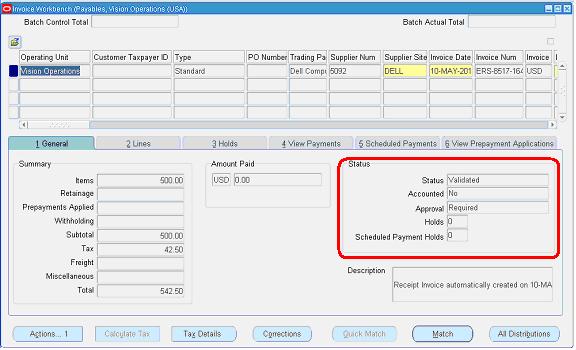
Stage 9: Checking the Invoice
Change to any Payables Responsibility
and open the invoices Form.
Query for the Purchase order as
below,


Click “Actions” Button then
tick the “Validate Check Box” and press “Ok” to validate the invoice

Below screenshot will give you the
status of the invoice
Stage 10: Creation of Accounting and
Payment
Once invoice got approved, we can
“Create Accounting” and “Create Payments” via “Action” Button in the “Invoice
Form” as we validated the invoice.
Thus the brief description of P2P cycle came to end.
Thus the brief description of P2P cycle came to end.
changes in 11i and R12 in P2P cycle
Procure to Pay
First let’s see what
the heading itself means? Procure to Pay means Procuring Raw
Materials required to manufacture the final or finished Goods to Paying
the Supplier from whom the material was purchased. But
this is not just two steps. It involves many steps. Let’s see the steps and
Oracle Application involved in performing those steps.
1.
Oracle
Purchasing: You enter Suppliers of
different materials and products you want to purchase to manufacture a finished
good that your organization plans to sell.
2.
Oracle
Purchasing: You prepare
a Request for Quotation (RFQ) and send it to
different suppliers to get the best and/or economical price for the product.
3.
Oracle
Purchasing: Suppliers sends
their quotations and you upload those quotations in Oracle Purchasing to get
the best three quotes and further to get the one best quote.
4.
Oracle
Purchasing: You prepare
a Purchase Order(PO) against the best RFQ to buy the goods
from the supplier who quoted the suitable price and sends the PO to that
supplier
5.
Oracle
Purchasing: The supplier
receives the confirmation of purchase from PO and ships the ordered goods. You
receive the goods enter aGoods Received Note (GRN) in Oracle
Purchasing.
6.
Oracle
Inventory / Oracle Assets: It’s
up to you whether you want to receive the goods at your head office or you
Inventory directly. In either case you move the received goods to your
different Raw Material Inventory from Oracle Purchasing to Oracle Inventory and
the Item Count increases. If the item is Asset Type then it will move to Oracle
Assets at the time of Invoice creation in Oracle Payables.
7.
Oracle
General Ledger: Once you move
the goods to Oracle Inventory, it sends the Material Accounting to Oracle
General Ledger.
8.
Oracle
Payables: After this the
supplier sends you the invoice for the purchased goods and you Enter or Match
the invoice against the PO from Oracle Purchasing in Oracle Payables. As said
before, if the item is Asset in nature then it will move to Oracle Asset.
9.
Oracle
General Ledger: When you enter
the invoice it means that you have created a Liability against that supplier
and also you have recorded the expense incurred or asset purchased. Oracle
Payables sends the invoice accounting to Oracle General Ledger.
10.Oracle Payables: You pay the invoice and settle the
Liability.
11.Oracle General Ledger: The liability is settled and your cash
movement account is updated.
12.Oracle Cash Management: As you pay the invoice Oracle Payables
sends the payment information to Oracle Cash Management for Bank
Reconciliation. Once reconciled, Oracle Cash Management sends the updated
Bank/Cash accounting entry to Oracle General Ledger.
13.Oracle General Ledger: Your cash at bank is updated with actual
balance.
14.Oracle Process Manufacturing(OPM) / Oracle
Discrete Manufacturing(ODM): You start the manufacturing of your final product. Both
OPM or ODM requests the different raw materials from your inventory
organizations and manufactures a finished good.
15.Oracle Inventory: As the raw materials are issued to OPM and ODM
the inventory sends the issuing material accounting to General Ledger and
decreases the Item Count from the Raw Material Store. As the finished good is
prepared, Oracle Inventory receives the finished good in Finished Good Store
and increase the Item Count.
Now the final product
is ready to be sold in the market.
1) Create Requisition
11i
Requisition is nothing
but a formal request to buy something (like Inventory material, office supplies
etc)
needed for the
enterprise. Only an employee can create one. There are two types of
requisitions:
Internal Requisition:
Internal requisitions provide the mechanism for requesting and transferring
material from
one inventory to other
inventory.
Purchase requisition: Unlike Internal requisitions, Purchase
requisitions are used for requesting material from suppliers.
Navigation:
Purchasing Vision
Operations (USA) > Requisitions > Requisitions
Choose the requisition
type and enter the Item, quantity, Price details in the Lines tab.
In Source Details tab,
specify the Buyer name.
Click the
Distributions button. Enter the Charge Account.
Save the work. The
status of the requisition will now be Incomplete. And now the Approve button is
highlighted. The requisition needs to be approved first before proceeding
further by the concerned authority. Submit this requisition for Approval by
clicking on the Approve button. The status will now be updated to In Process
.The workflow then will send an Approval notification to the concerned person
(derived based on hierarchy used Position or Supervisor hierarchy) using which
he can Approve or Reject the requisition.
At any time the status
of requisition can be checked using the Requisition summary window.
Navigation:
Requisitions >
Requisition Summary
Enter requisition
number and click on the find button.
We can also check the
Action History of requisition (it will show details about who has submitted,
approved
and cancelled the
requisitions) as below:
Navigation:
Tools menu > Action
History.
Underlying Tables:
PO_REQUISITION_HEADERS_ALL
PO_REQUISITION_LINES_ALL
PO_REQ_DISTRIBUTIONS_ALL
R12
Click on Distributions
to View the charge Account.
Save and Submit for
Approval
Check the status of the Requisition.
Query for the
Requisition Number and click Find.
Here for our example
purpose, I kept the submitted and approved person has same and hence it shows
the status as approved.
To see the approval
status, please follow the below navigation.
Note:
1.
Without changing
Responsibility and without closing windows buyers will now be able to view
consolidated requisition demand spanning multiple operating units.
2.
The operating units
that buyers can transact on behalf of will be controlled by the security
profile associated with their responsibilities.
3.
Operating Unit extra
field in the R12 forms due to MOAC.
4.
Base tables are same
as 11i but more than 15 extra columns in R12 for the table
PO_REQUISTION_HEADERS_ALL, PO_REQUISTION_LINES_ALL and PO_REQ_DISTRIBUTIONS_ALL for tax etc.
The Supplier Details
in R12 : Many changes were
happened in supplier details in R12.
Suppliers into TCA -
Architecture in R12 :
Prior to R12 the
suppliers information is stored in PO_VENDORS. From R12 onwards supplier have
been moved in to the TCA Data Model.
HZ_PARTIES : This is the master table for
suppliers.
HZ_PARTY_USG_ASSIGNMENTS
: This table stores the Party Usages, for example,
for the suppliers it captures the fact that the given party_id is of type
SUPPLIER.
HZ_ORGANIZATION_PROFILES : This table captures additional Supplier information, for example, credit scoring details of Supplier or the Number of Employees working in Supplier Organization.
HZ_ORGANIZATION_PROFILES : This table captures additional Supplier information, for example, credit scoring details of Supplier or the Number of Employees working in Supplier Organization.
IBY_EXTERNAL_PAYEES_ALL : It captures payment related details of
the supplier. Like how should the supplier's remittance advice must be sent,
default Payment method Code for this supplier, Who bears the bank charges when
lets say SWIFT payment is made?
Note : This
information can be set up at the supplier level or supplier site level.
AP_SUPPLIERS : This is another master table that
replaces the PO_VENDORS table. It stores the supplier specific attributes.
POS_SUPPLIER_MAPPINGS : This table holds the mapping between
the AP_SUPPLIERS.VENDOR_ID and HZ_PARTIES.PARTY_ID.
This is useful in cases whereby two vendors effectively belong the same HZ_Party Record.
This is useful in cases whereby two vendors effectively belong the same HZ_Party Record.
ZX_PARTY_TAX_PROFILE : The taxation related details like Tax
Codes, and Tax Accounts etc have been moved from AP into ZX.
ZX is the name of a new Application "E-Business Tax".
ZX is the name of a new Application "E-Business Tax".
PO_VENDORS : PO_VENDORS is a view in R12, that
joins AP_SUPPLIERS & HZ_PARTIES.
Similarly, PO_VENDOR_SITES and PO_VENDOR_SITES_ALL are also views based upon AP_SUPPLIER_SITES_ALL.
Similarly, PO_VENDOR_SITES and PO_VENDOR_SITES_ALL are also views based upon AP_SUPPLIER_SITES_ALL.
2) Create Purchase Order
11i
There are 4 types of
Purchase Orders:
1. Standard PO: A Standard PO is created for onetime purchase
of various items
2. Planned PO: A Planned PO is a longterm agreement
committing to buy items or services from a single
source. You must
specify tentative delivery schedules and all details for goods or services that
you want to
buy, including charge
account, quantities, and estimated cost.
3. Blanket agreement: A Blanket PO is created when you know
the detail of the goods or services you plan to
buy from a specific
supplier in a period, but you do not know the detail of your delivery
schedules.
4. Contract
agreement: Contract purchase
agreements are created with your suppliers to agree
on specific terms and
conditions without indicating the goods and services that you will be
purchasing
Navigation for
creating a standard PO:
Purchase Orders >
Purchase Orders
Choose type as
Standard Purchase Order. Enter the Supplier, Buyer. In the Lines tab, specify
the line number, line type, Item, quantity, price etc.
Click Terms to enter
terms, conditions, and control information for purchase orders.
Click Currencybutton
to enter and change currency information for purchase orders, RFQs, and
quotations.
Click Shipments button
to enter multiple shipments for standard and planned purchase order lines
Purchase order shipment specifies the quantity, shipto organization and
location, date you want your supplier to deliver the items on a purchase order
line, and country of origin for the items. When you save, Purchasing
creates distributions depending on the default information available.
To enter more shipment
information, select the More tab.
1. Enter the Receipt
Close Tolerance percent, Invoice Close Tolerance percent to set the receiving
and
invoice close point.
2. Select one of the
following options for Match Approval Level:
TwoWay: Purchase order and invoice quantities
must match within tolerance before the corresponding
invoice can be paid.
ThreeWay: Purchase order, receipt, and invoice
quantities must match within tolerance before the
corresponding invoice
can be paid.
FourWay: Purchase order, receipt, accepted, and
invoice quantities must match within tolerance before the
corresponding invoice
can be paid.
1. Select an Invoice
Match Option:
Purchase Order:
Payables must match the invoice to the purchase order.
Receipt: Payables must
match the invoice to the receipt.
Save the work.
Click the Receiving
Controls button to enter receiving control information for purchase orders.
-Enter the maximum
acceptable number of Days Early and Days Late for receipts.
-Enter the Action for
receipt date control.
-Enter the maximum
acceptable overreceipt Tolerance percent (receipts that exceed the
quantity received
tolerance).
-Enter the Action for
Overreceipt Quantity.
-Select Allow
Substitute Receipts to indicate that receivers can receive substitute items in
place
of ordered items.
-Enter the default
Receipt Routing that you assign goods: Direct Delivery, Inspection Required,
or Standard Receipt.
-Enter the Enforce
Ship To location option to determine whether the receiving location must be
the same as the shipto
location.
Save the work.
Click Distributions
button to enter distributions for the shipments.
Select more tab to
enter more details and the requisition number (optional).
Save the work.
Click on the Approve
button to initiate the Approval process.
Underlying Tables:
PO_HEADERS_ALL
PO_LINES_ALL
PO_DISTRIBUTIONS_ALL
(REQ_HEADER_REFERENCE_NUM in Distributions table is the Requisition number for
this PO)
PO_LINE_LOCATIONS_ALL
R12
For creating a
Purchase order, let us use the “Autocreate Documents” Form. Follow the below
Navigation and Query for the Requisition.
Click on Automatic as
shown in the above figure to create a Purchase Order
Click on “Create”
button to create a Purchase order
View the shipment
screen to change the “Match Approval Level” to “2-Way”.
Click the “Receiving
Controls” to make sure that the “Routing” is made as “Direct Routing”
Click Save and submit
for Approval.
Note down the PO
number.
Note:
1.
In Release 11i10 generation
of purchasing documents in Adobe PDF format required organizations to create
layout templates in the form of XSL-FO style sheets. With Release 12.0
organizations can also use RTF or PDF layout templates which require little
training to configure and maintain.
2.
Base tables are same
as 11i but few extra columns.
3.
Release 12.0 allows
finer control of how blanket agreements are enabled for automatic document
sourcing. Buyers can now choose to enable them only in specific inventory
organizations.
3) Create Receipt
11i
Create a receipt to
receive the items in the Purchase Order.
Navigation:
Receiving--Receipts
Enter the PO Number
and select find button.
Go to Lines, check the
lines you want to receive in the PO.
Click on Header button
and Save which creates the receipt.
Now can check the
Inventory in the same subinventory for the item's on-hand quantity.
Receipt Tables are:
RCV_SHIPMENT_HEADERS
RCV_SHIPMENT_LINES
(Lines Table has PO_HEADER_ID)
R12
Navigate to RECEIVING-->RECEIPTS
Query with the Purchase
order created in the above stage.
Check the check box
near to the lines that are received and click save.
Click the “Header
Button” to view the Receipt Number.(8457)
Note:
1) Base tables are
same as in 11i but few extra columns.
4) Create Invoice in Payables
11i
Once the goods are
received, its time to pay the vendor for the goods purchased and hence the
invoices are created.
Navigation: Payables, Vision Operations (USA) >
InvoicesEntryInvoices
Enter type --Standard,
supplier information and amount.
Click the Match button
to match to either Purchase Order or Receipt (depending on the Invoice Match
option specified on the PO)
and avoid manually entering the invoice.
Enter the PO Number
you want match to and click Find.
Select the lines
required and click on Match button.
Click on Distribute
button to navigate to the Match to Purchase Order Distributions window.
This creates the
invoice and you can see the status of the invoice as Never Validated. it has to
be Validated and Accounted before you can pay it.
Validating the
Invoice: Click on Actions
Button and Select Validate. Click on OK button.
Now you can see the
status of the invoice as Validated, if there are no issues during validation.
Create Accounting
Entries:
Click on Actions
Button and Select Create Accounting. Click on OK button.
You can see the
Accounting Entries here:
Tools --View
Accounting
Now we can see the
Accounted status as Yes
Invoice Tables:
AP_INVOICES_ALL
AP_INVOICE_DISTRIBUTIONS_ALL
Accounting Entries
Tables:
AP_ACCOUNTING_EVENTS_ALL
AP_AE_HEADERS_ALL
AP_AE_LINES_ALL
R12
Payables : Creating invoices, debit memo, credit memo and
do payments for the suppliers.
The information
regarding these invoices are stored into ap_invoices_all and also in in to
ap_invoice_lines_all
Till 11i version, we
have seen invoices:
·
Had only distributions
line.
·
Allocation of freight
and special charges are captured at the distribution level only
·
Tax and payment and
Project accounting Payment was captured through global Descriptive
Flexfields.
But in R12 ,
1.
Invoice Lines as a new
additional line accommodated in Invoice data model.
2.
Allocate freight and
special charges are captured to the lines on the invoice
3.
Invoice distributions
created at the maximum level of detail similar to 11i.
Because of
introduction of invoice lines there is significant improvement of data
flow with n other oracle modules
·
Fixed Asset - Asset
Tracking
·
Business Tax - Tax
line
·
Payment - Payment
·
SubLedger Accounting –
Accounting
Navigate to any
Purchasing Responsibility and view -->Requests
Submit the below
requests by providing the Receipt number as Parameter to create an
invoice. (pay on receipt auto invoice).
Check the status of
the program.
Checking the Invoice
Change to any Payables
Responsibility and open the invoices Form.
Query for the Purchase
order as below.
Click “Actions” Button
then tick the “Validate Check Box” and press “Ok” to validate the invoice and
will change the status of invoice.
Creation of Accounting and
Payment
Once invoice got
approved, click actions so that we can “Create Accounting” and “Create
Payments” via “Action” Button in the “Invoice Form” as we validated the
invoice.
Note:
1.
AP_INVOICE_LINES_ALL
holds invoice lines records entered manually, generated automatically or
imported from the Open Interface tables. An invoice can have one or more
invoice lines and an invoice line can have one or more invoice distributions.
An invoice line represents goods (direct or indirect materials), service(s), and/or
associated tax/freight/miscellaneous charges invoiced from a supplier.
5) Making a Payment
11i
Go to the Invoice
window and query the invoice you want to pay. You would see Amount paid as 0.00
before
you make a payment.
Click Actions button.
Select Pay in full and click OK.
Select the bank
account and Document. Save the Work.
Now that the payment
is made, when you query for the invoice in Invoice window, you will the Amount
Paid as $4,000.00.
Create Accounting
entries for payment. Click
Actions and select Create Accounting.
Select the void
checkbox to cancel the payment.
View Accounting
Entries:
In the Payments
window, query for the payment.
Tools menu View
Accounting
Payment Tables:
AP_INVOICE_PAYMENTS_ALL
AP_PAYMENT_SCHEDULES_ALL
AP_CHECKS_ALL
AP_CHECK_FORMATS
AP_BANK_ACCOUNTS_ALL
AP_BANK_BRANCHES
AP_TERMS
You can also pay the
invoices using Payment Batch screen. Refer to the article Make AP Payments
through
R12
Once invoice got
approved, click actions so that we can “Create Accounting” and “Create
Payments” via “Action” Button in the “Invoice Form” as we validated the
invoice.
Note:
1.
Base tables are same
as 11i but
Suppliers Bank Accounts
11i
1.
Banks/Branches defined
in AP
2.
Bank accounts often
replicated in multiple OUs Before
R12
1.
Suppliers, Banks and
Branches are defined as Parties in TCA
2.
Supplier (party’s)
payment information and all payment instruments (Bank Accounts, Credit Cards)
moved into Oracle Payments.
3.
6) Transfer to General Ledger
11i
Navigation:
Payables
Responsibility > View Requests
Run the concurrent
program Payables Transfer to General Ledger with the required parameters.
Journal Import:To transfer the data from General Ledger
Interface table to General Ledger, run the Journal Import program from Oracle
General Ledger.
Navigation: General
Ledger > Journal> Import> Run
Parameters:
·
Select the appropriate
Source.
·
Enter one of the
following Selection Criteria:
No Group ID: To import
all data for that source that has no group ID. Use this option if you specified
a NULL group ID for this source.
All Group IDs: To import
all data for that source that has a group ID. Use this option to import multiple
journal batches for the same source with varying group IDs.
Specific Group ID: To
import data for a specific source/group ID combination. Choose a specific
group ID from the List of Values for the Specific Value field.
If you do not specify a
Group ID, General Ledger imports all data from the specified journal entry
source, where the Group_ID is null.
·
Define the Journal
Import Run Options (optional)
Choose Post Errors to
Suspense if you have suspense posting enabled for your set of books to post the
difference resulting from any unbalanced journals to your suspense account.
Choose Create Summary
Journals to have journal import create the following:
• one journal line for all transactions that share
the same account, period, and currency and that has a debit balance
• one journal line for all transactions that share
the same account, period, and currency and that has a credit balance.
·
Enter a Date Range to
have General Ledger import only journals with accounting dates in that range.
If you do not specify a date range, General Ledger imports all journals data.
·
Choose whether to Import
Descriptive Flexfields, and whether to import them with validation.
Click on Import
button.
Posting:
We have to Post journal
batches that we have imported previously to update the account balances in
General Ledger.
Navigation: General
Ledger> Journals > Enter
Query for the unposted
journals for a specific period
If you know the batch
name to be posted you can directly post using the Post window
Navigation: General
Ledger> Journals> Post
R12
Navigation:
Payables
Responsibility > View -->Requests
Run the concurrent
program "create accounting" with the required parameters.
Mode= Final
Post in GL =
yes....etc
The Create Accounting
process has similar options, you can create accounting in Final or Draft mode
and if Final mode is selected, the Transfer to GL parameter can be used to
automatically transfer the accounting created by the corresponding run. When the
Create Accounting process transfers the journal entries to GL it only transfers
the accounting created by the process that calls it. If there is accounting
created by the online option = Final or a previous Create Accounting program
that was not transferred, that accounting will not be transferred. The Transfer
Journal Entries to GL program needs to be ran separately to transfer any
accounting created online or created by a previous Create Accounting process
that did not transfer the entries.
Note:
1.
In R12 the adjustment in
GL is automated. No manual journal is required. The create accounting program
and Transfer to GL program will transfer the write off journals automatically
to General Ledger.
2.
From a
reconciliation perspective the picture above shows what’s changes between R11i
and R12. In Release 11i you reconciled your transactions and distributions to
General Ledger through transactional reports. In the accounting reports in
Release 11i you’d see the balances but not the transactional information.
3.
In Release 12 there
is no reason to reconcile distributions on transactions to General Ledger. You
can still reconcile transaction reports to accounting reports. The new
accounting reports in Release 12 now also contain more comprehensive
information not just on balances but also on suppliers, customers and
transactions.The point to note is that when you do account balance
reconciliation you should ignore distributions in Release 12, especially if you
have altered your subledger accounting rules.
RECONCILIATION CASH
MANAGEMENT-DIFFERENCE BETWEEN 11i AND R12.
The Sub-Ledger
Accounting ( SLA ) Flow Chart in R12
Some of the SLA TABLES
:
XLA_AE_HEADERS : stores subledger journal entries. There is a
one-to-many relationship between accounting events and journal entry headers.
XLA_AE_LINES : Stores
Journal entry lines
XLA_DISTRIBUTION_LINKS : Links b/w
transactions and sub-ledger journal entries.
No comments:
Post a Comment